Android Integration
The source code of the next step by step guide can be downloaded here (opens in a new tab).
Pre-Requirements
Download (opens in a new tab) and install Android Studio Flamingo or higher version.
Steps
- Open android studio and create a new default App.
- Configure internet access permissions in manifest.
- Create the HTML Template.
- Create the Android Layout.
- Create the Android Main Activity.
- Configuration object to interpolate dynamic parameters in the HTMLTemplate.
- Instantiate Webview.
- Load processed HTML in the Webview.
- Create the Subscription and EventHandler for device rotation.
- Prevent device from locking when user isn't interacting.
- Handle player events.
- Handle player close
Steps detailed
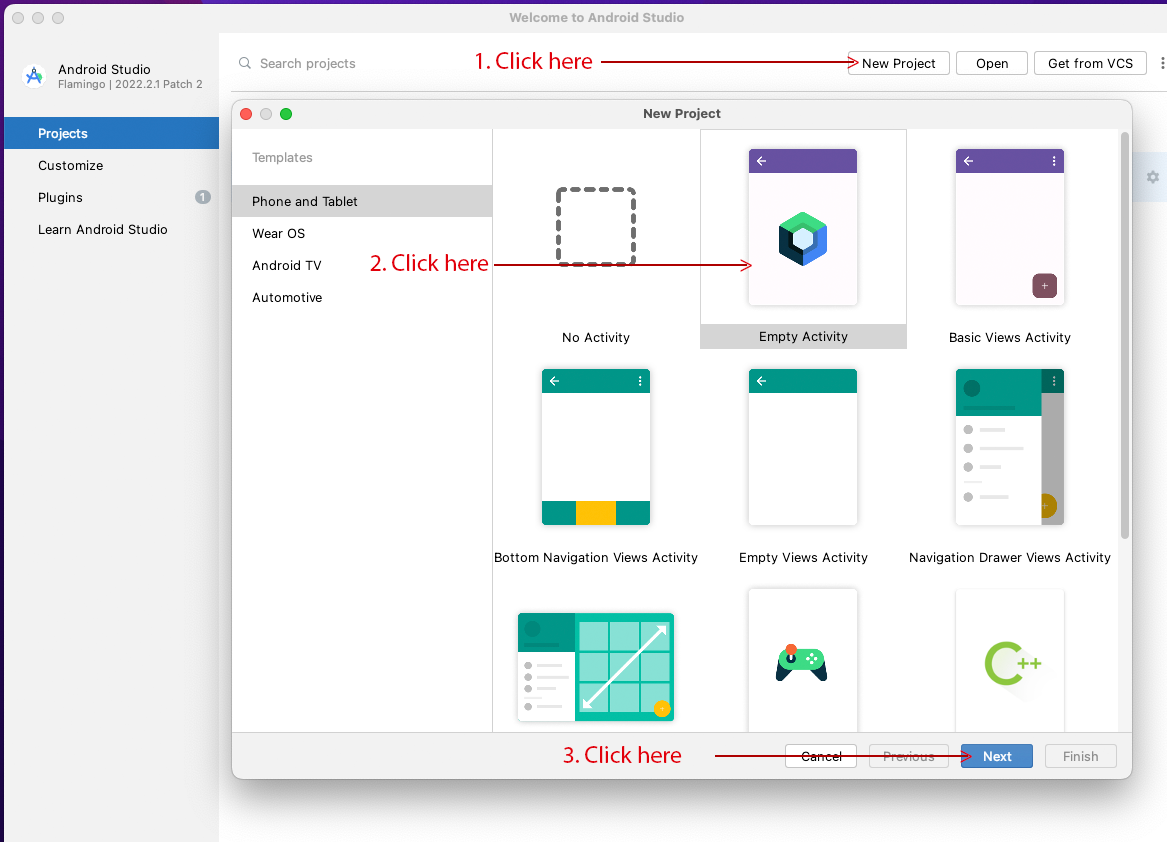
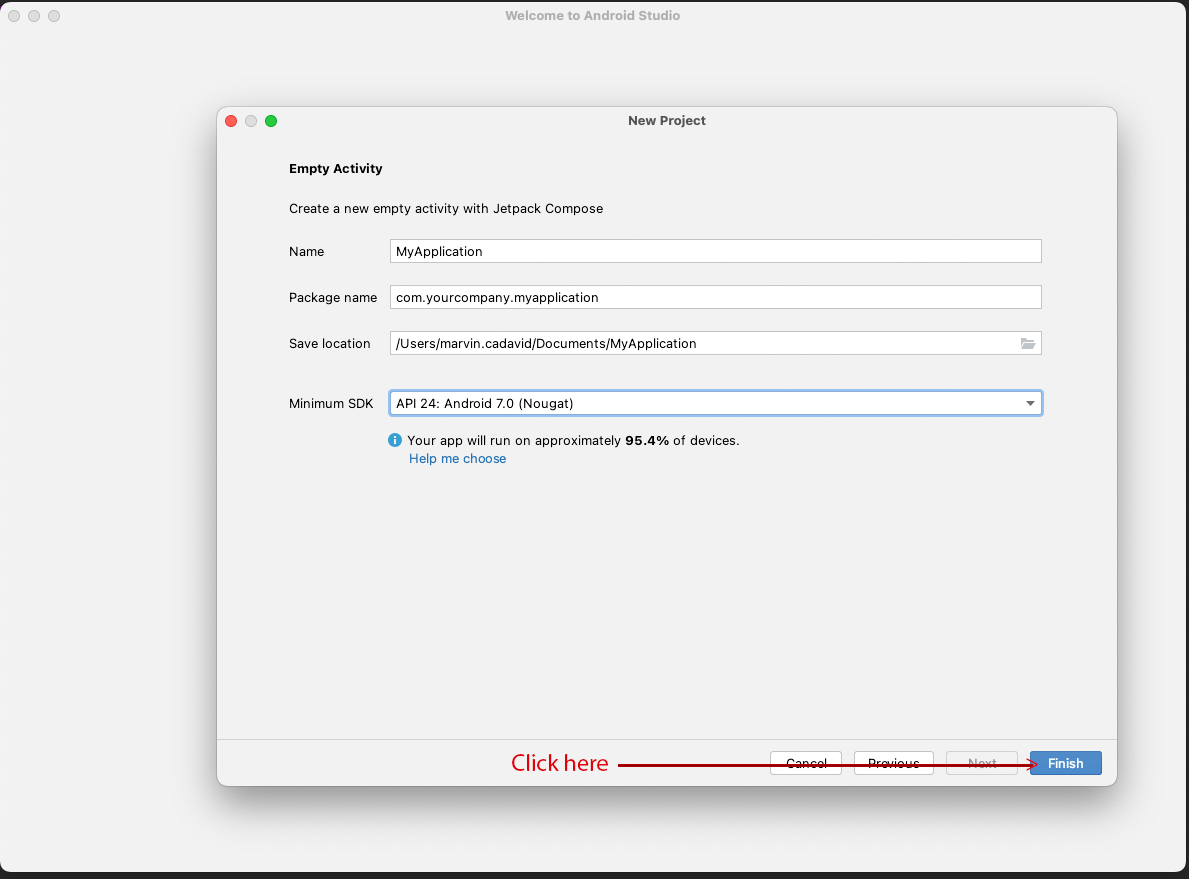
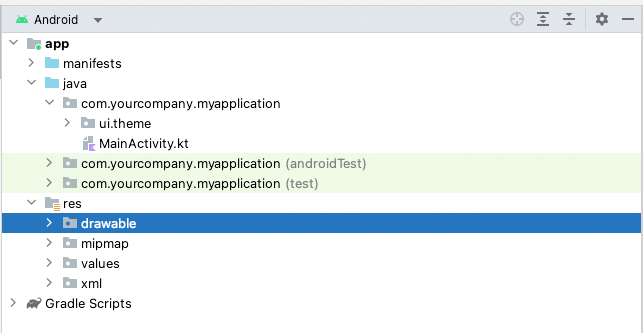
1. Open android studio and create a new default App.
File > New > New Project
This is the initial structure of the project:
2. Configure internet access permissions.
In order to enable internet access in your application, you need to configure a permission in the manifest file. Please include the following line of XML code:
<uses-permission android:name="android.permission.INTERNET"></uses-permission>Here's an example of a manifest file with the necessary line added to enable internet access:
<?xml version="1.0" encoding="utf-8"?>
<manifest xmlns:android="http://schemas.android.com/apk/res/android"
    xmlns:tools="http://schemas.android.com/tools">
    <uses-permission android:name="android.permission.INTERNET"></uses-permission>
    <application
        android:allowBackup="true"
        android:dataExtractionRules="@xml/data_extraction_rules"
        android:fullBackupContent="@xml/backup_rules"
        android:icon="@mipmap/ic_launcher"
        android:label="@string/app_name"
        android:roundIcon="@mipmap/ic_launcher_round"
        android:supportsRtl="true"
        android:theme="@style/Theme.MyApplication"
        android:usesCleartextTraffic="true"
        tools:targetApi="31">
        <activity
            android:name=".MainActivity"
            android:usesCleartextTraffic="true"
            android:exported="true"
            android:configChanges="screenLayout|screenSize|orientation"
            android:label="@string/app_name"
            android:theme="@style/Theme.MyApplication">
            <intent-filter>
                <action android:name="android.intent.action.MAIN" />
                <category android:name="android.intent.category.LAUNCHER" />
            </intent-filter>
        </activity>
    </application>
</manifest>
You can check the manifest file source code here (opens in a new tab).
3. Create the HTML Template file.
You can take a look at our template definition here (opens in a new tab). and in order to understand this template you can read the breakdown section here.
4. Create the Android Layout.
To render HTML content in your activity_main.xml file, you need to add the following XML code:
<WebView
    android:id="@+id/webview2"
    android:layout_width="match_parent"
    android:layout_height="251dp"
    android:visibility="gone">
</WebView>
Here's an example of the activity_main.xml file with the necessary XML code added:
<?xml version="1.0" encoding="utf-8"?>
<androidx.coordinatorlayout.widget.CoordinatorLayout xmlns:android="http://schemas.android.com/apk/res/android"
    xmlns:app="http://schemas.android.com/apk/res-auto"
    xmlns:tools="http://schemas.android.com/tools"
    android:layout_width="match_parent"
    android:layout_height="match_parent"
    android:fitsSystemWindows="true"
    tools:context=".MainActivity">
    <WebView
        android:id="@+id/webview2"
        android:layout_width="match_parent"
        android:layout_height="251dp"
        android:visibility="gone">
    </WebView>
    <com.google.android.material.appbar.AppBarLayout
        android:id="@+id/wrapper"
        android:layout_width="match_parent"
        android:layout_height="wrap_content"
        android:fitsSystemWindows="true">
        <LinearLayout
            android:id="@+id/webviewlayout"
            android:layout_width="match_parent"
            android:layout_height="251dp"
            android:orientation="vertical">
            <WebView
                android:id="@+id/playerWebView"
                android:layout_width="match_parent"
                android:layout_height="match_parent">
            </WebView>
        </LinearLayout>
    </com.google.android.material.appbar.AppBarLayout>
</androidx.coordinatorlayout.widget.CoordinatorLayout>
You can take a look at our layout source code here (opens in a new tab).
5. Create the Android Main Activity.
a. Configuration object to interpolate dynamic parameters in the HTMLTemplate.
Each parameter is explained in the available configuration params section. Each customer should implement a dynamic way to set the parameters.
private fun loadWebViewPlayer() {

    val baseGeniusLivePlayerUrl = "https://genius-live-player-uat.betstream.betgenius.com/widgetLoader?"
    val customerId: String = "0000"
    val fixtureId: String = "20000062994"
    val betVisionFixtureId: String = "9889284"
    val userSessionId: String = "123456"
    val region: String? = "CO"
    val device: String = "DESKTOP"
    val controlsEnabled: Boolean = true
    val audioEnabled: Boolean = true
    val autoplayEnabled: Boolean = true
    val allowFullScreen: Boolean = true
    val playerWidth: String = "100vw"
    val playerHeight: String = "100vh"
    val bufferLength: Int = 2
    val minWidth: String = "100px"

    val htmlTemplate = geniusTemplate

    val htmlTemplateMapped = htmlTemplate
        .replace("%{baseGeniusLivePlayerUrl}", baseGeniusLivePlayerUrl)
        .replace("%{customerId}", customerId)
        .replace("%{fixtureId}", fixtureId)
        .replace("%{userSessionId}", userSessionId)
        .replace("%{region}", region.toString())
        .replace("%{device}", device)
        .replace("%{audioEnabled}", audioEnabled.toString())
        .replace("%{controlsEnabled}", controlsEnabled.toString())
        .replace("%{autoplayEnabled}", autoplayEnabled.toString())
        .replace("%{allowFullScreen}", allowFullScreen.toString())
        .replace("%{playerWidth}", playerWidth)
        .replace("%{playerHeight}", playerHeight)
        .replace("%{bufferLength}", bufferLength.toString())
        .replace("%{minWidth}", minWidth)

    webView?.loadDataWithBaseURL(
        "https://www.example.com?fixtureImmersive=betVisionFixtureId",
        htmlTemplateMapped,
        "text/html",
        "UTF-8",
        ""
    )
}
You can take as a reference our MainActivity source code here (opens in a new tab).
b. Instantiate Webview.
The setupLayout function have a webChromeClient with the intention of creating a navigator instance in the webView with the required configuration to allow javascript be executed.
private fun setupLayout() {
    webView = findViewById(R.id.playerWebView)
    webView?.settings?.javaScriptEnabled = true
    webView?.settings?.domStorageEnabled = true
    webView?.settings?.allowFileAccess = true
    webView?.webChromeClient = MyChrome(webView, window, this)
    webView?.webViewClient = WebViewClient()

    windowInsetsController =
        WindowCompat.getInsetsController(window, window.decorView)
    windowInsetsController?.systemBarsBehavior =
        WindowInsetsControllerCompat.BEHAVIOR_SHOW_TRANSIENT_BARS_BY_SWIPE
}
Chrome client configuration.
private class MyChrome() : WebChromeClient() {
    var webView: WebView? = null
    var window: Window? = null
    var mainActivity: MainActivity? = null

    constructor(webView: WebView?, window: Window, mainActivity: MainActivity) : this() {
        this.webView = webView
        this.window = window
        this.mainActivity = mainActivity
    }

    override fun onPermissionRequest(request: PermissionRequest) {
      request.grant(request.resources)
  }

    override fun getDefaultVideoPoster(): Bitmap? {
        return Bitmap.createBitmap(10, 10, Bitmap.Config.ARGB_8888)
    }

    override fun onPermissionRequest(request: PermissionRequest) {
        request.grant(request.resources)
    }

    var fullscreen: View? = null
    override fun onHideCustomView() {
        fullscreen!!.visibility = View.GONE
        webView?.visibility = View.VISIBLE
    }

    override fun onShowCustomView(view: View, callback: CustomViewCallback) {
        webView?.visibility = View.GONE
        if (fullscreen != null) {
            (window?.decorView as FrameLayout).removeView(fullscreen)
        }
        fullscreen = view
        (window?.decorView as FrameLayout).addView(
            fullscreen,
            FrameLayout.LayoutParams(-1, -1)
        )
        fullscreen!!.visibility = View.VISIBLE
    }
}
To remove the big play gray overlay button on player is important implement this part in chrome web client:
override fun getDefaultVideoPoster(): Bitmap? {
return Bitmap.createBitmap(10, 10, Bitmap.Config.ARGB_8888)
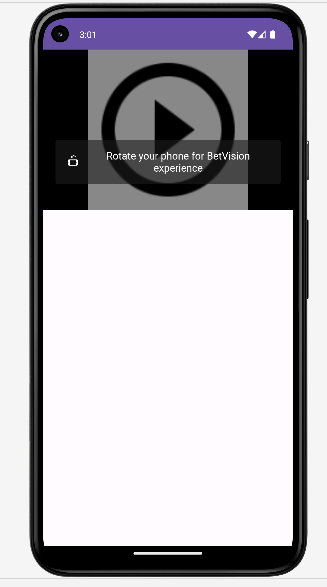
}c. Load processed HTML in the Webview.
After processing the HTML content with the parameters, try passing it as the second parameter of the loadDataWithBaseURL function with a string type. in order to check additional information about loadDataWithBaseURL method try referring here (opens in a new tab).
webView?.loadDataWithBaseURL(
"http://www.example.com?fixtureImmersive=betVisionFixtureId",
htmlTemplateMapped,
"text/html",
"UTF-8",
"",
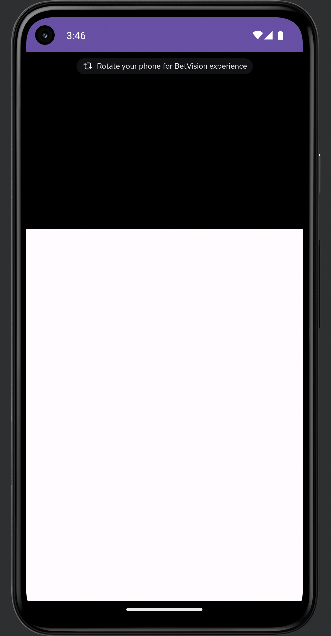
);In this step the WebView should render the video player just like in the next image:
d. Create the Subscription and EventHandler for device rotation.
EventHandler for device rotation. This code needs to be added in the onCreate function:
orientationEventListener = object : OrientationEventListener(this) {
    override fun onOrientationChanged(orientation: Int) {
        handleOrientationChange(orientation)
    }
}
The "handleOrientationChange" function handles the screen orientation based on the device rotation:
private fun handleOrientationChange(orientation: Int) {
    val newConfig = resources.configuration
    when (orientation) {
        in 0..60, in 330..359 -> {
            newConfig.orientation = Configuration.ORIENTATION_PORTRAIT
            isReversePortrait = false
            isReverseLandscape = false
        }
        in 90..150 -> {
            newConfig.orientation = Configuration.ORIENTATION_LANDSCAPE
            isReversePortrait = false
            isReverseLandscape = true
        }
        in 180..210 -> {
            newConfig.orientation = Configuration.ORIENTATION_PORTRAIT
            isReversePortrait = true
            isReverseLandscape = false
        }
        in 240..300 -> {
            newConfig.orientation = Configuration.ORIENTATION_LANDSCAPE
            isReversePortrait = false
            isReverseLandscape = false
        }
    }
    onConfigurationChanged(newConfig)
}
The "onConfigurationChanged" function handles the behavior of the video player based on the device's orientation. When the device is in landscape mode, the video player is automatically set to fullscreen mode. Conversely, when the device is in portrait mode, the video player exits fullscreen automatically by sending a JavaScript click event to the video player widget.
The "onConfigurationChanged" function relies on several other functions to achieve this behavior:
- changeRequestedOrientation
- handlePortraitOrientation
- handleLandscapeOrientation
- getPortraitOrientation
- getLandscapeOrientation
override fun onConfigurationChanged(newConfig: Configuration) {
   super.onConfigurationChanged(newConfig)
   changeRequestedOrientation(newConfig)
}

 private fun handlePortraitOrientation() {
   val scriptFunction = "javascript:" +
           "var isFullScreen = document.fullscreenElement;" +
           "if(isFullScreen) { document.querySelector('.full-screen-btn').click()}"
   windowInsetsController?.show(WindowInsetsCompat.Type.systemBars())
   webView?.loadUrl(scriptFunction)
}

private fun handleLandscapeOrientation() {
   val scriptFunction = "javascript:" +
           "var isFullScreen = document.fullscreenElement; " +
           "if(!isFullScreen) { document.querySelector('.full-screen-btn').click()}"
   windowInsetsController?.hide(WindowInsetsCompat.Type.systemBars())
   webView?.loadUrl(scriptFunction)
}

private fun changeRequestedOrientation(newConfig: Configuration) {
   if (newConfig.orientation == Configuration.ORIENTATION_PORTRAIT) {
       requestedOrientation = getPortraitOrientation()
       handlePortraitOrientation()
   } else if (newConfig.orientation == Configuration.ORIENTATION_LANDSCAPE) {
       requestedOrientation = getLandscapeOrientation()
       handleLandscapeOrientation()
   }
}

private fun getPortraitOrientation(): Int {
   return if (isReversePortrait) {
       ActivityInfo.SCREEN_ORIENTATION_REVERSE_PORTRAIT
   } else {
       ActivityInfo.SCREEN_ORIENTATION_SENSOR_PORTRAIT
   }
}

private fun getLandscapeOrientation(): Int {
   return if (isReverseLandscape) {
       ActivityInfo.SCREEN_ORIENTATION_REVERSE_LANDSCAPE
   } else {
       ActivityInfo.SCREEN_ORIENTATION_SENSOR_LANDSCAPE
   }
}
e. Prevent device from locking when user isn't interacting:
In the video view it is recommended to avoid the automatic screen lock, so that the user enjoys a fluid experience without having to constantly touch the screen. In order to enable this option you must add the following function:
private fun setupLayout() {
  window.addFlags(WindowManager.LayoutParams.FLAG_KEEP_SCREEN_ON)
  .
  .
  .
}
When the view is closed, the feature should be disabled with the following code:
override fun onDestroy() {
    super.onDestroy()
    // Remove the FLAG_KEEP_SCREEN_ON flag
    window.clearFlags(WindowManager.LayoutParams.FLAG_KEEP_SCREEN_ON)
}
6. Handle player events.
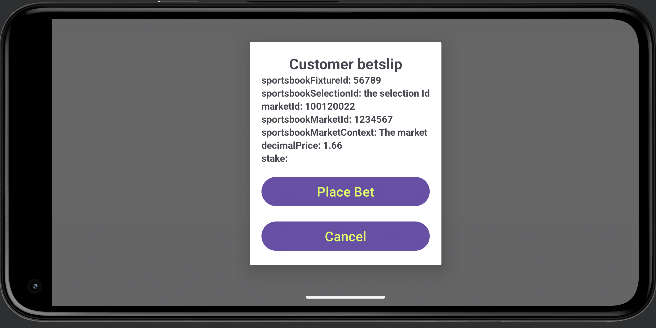
The video player has the ability to emit events via javascript which can be handled via methods in your Android application code. this way you can display fully native visual components in your application. For the following example we will show how to handle a video player event issued from javascript, finally we will show a dialog box with all the information contained in the body of the event message. To start, we need to create a small view called betslip.xml:
<LinearLayout
  xmlns:android="http://schemas.android.com/apk/res/android"
  android:layout_width="match_parent"
  android:layout_height="match_parent"
  android:orientation="vertical"
  android:padding="16dp"
>
  <TextView
    android:layout_width="match_parent"
    android:layout_height="wrap_content"
    android:text="Customer betslip"
    android:textSize="20sp"
    android:textStyle="bold"
    android:gravity="center"
  />

  <TextView
    android:id="@+id/sportsbookFixtureIdTextView"
    android:layout_width="match_parent"
    android:layout_height="wrap_content"
    android:text="sportsbookFixtureId: [sportsbookFixtureId]"
    android:textSize="13sp"
    android:textStyle="bold"
    android:gravity="start"
  />

  <TextView
    android:id="@+id/sportsbookSelectionIdTextView"
    android:layout_width="match_parent"
    android:layout_height="wrap_content"
    android:text="sportsbookSelectionId: [sportsbookSelectionId]"
    android:textSize="13sp"
    android:textStyle="bold"
    android:gravity="start"
  />

  <TextView
    android:id="@+id/marketIdTextView"
    android:layout_width="match_parent"
    android:layout_height="wrap_content"
    android:text="marketId: [marketId]"
    android:textSize="13sp"
    android:textStyle="bold"
    android:gravity="start"
  />

  <TextView
    android:id="@+id/sportsbookMarketIdTextView"
    android:layout_width="match_parent"
    android:layout_height="wrap_content"
    android:text="sportsbookMarketId: [sportsbookMarketId]"
    android:textSize="13sp"
    android:textStyle="bold"
    android:gravity="start"
  />

  <TextView
    android:id="@+id/sportsbookMarketContextTextView"
    android:layout_width="match_parent"
    android:layout_height="wrap_content"
    android:text="sportsbookMarketContext: [sportsbookMarketContext]"
    android:textSize="13sp"
    android:textStyle="bold"
    android:gravity="start"
  />

  <TextView
    android:id="@+id/decimalPriceTextView"
    android:layout_width="match_parent"
    android:layout_height="wrap_content"
    android:text="decimalPrice: [decimalPrice]"
    android:textSize="13sp"
    android:textStyle="bold"
    android:gravity="start"
  />

  <TextView
    android:id="@+id/stakeTextView"
    android:layout_width="match_parent"
    android:layout_height="wrap_content"
    android:text="stake: [stake]"
    android:textSize="13sp"
    android:textStyle="bold"
    android:gravity="start"
  />

  <Button
    android:id="@+id/addbetslip_button"
    android:layout_width="match_parent"
    android:layout_height="wrap_content"
    android:text="Place Bet"
    android:textSize="18sp"
    android:textColor="#E1FF67"
    android:layout_marginTop="13dp"
  />

  <Button
    android:id="@+id/cancel_button"
    android:layout_width="match_parent"
    android:layout_height="wrap_content"
    android:text="Cancel"
    android:textSize="18sp"
    android:textColor="#E1FF67"
    android:layout_marginTop="13dp"
  />
</LinearLayout>
Once this view is created, we need to implement the javascript interface in the MainActivity:
internal class JavaScriptInterface(private val context: Context) {
  @JavascriptInterface
  fun postSelectedMarket(betslipItem: String) {

      val jsonObject = JSONObject(betslipItem)

      // Extract fields from the JSON object

      val sportsbookFixtureId: String = jsonObject.optString("sportsbookFixtureId", "")
      val sportsbookSelectionId: String = jsonObject.optString("sportsbookSelectionId", "")
      val marketId: String = jsonObject.optString("marketId", "")
      val sportsbookMarketId: String = jsonObject.optString("sportsbookMarketId", "")
      val sportsbookMarketContext: String = jsonObject.optString("sportsbookMarketContext", "")
      val decimalPrice: String = jsonObject.optString("decimalPrice", "")
      val stake: String = jsonObject.optString("stake", "")

      val dialogView = LayoutInflater.from(context).inflate(R.layout.betslip, null)

      val dialog = Dialog(context)
      dialog.setContentView(dialogView)
      dialog.setCanceledOnTouchOutside(false);
      dialog.setTitle("Customer Betslip")

      var sportsbookFixtureIdTextView: TextView =  dialogView.findViewById(R.id.sportsbookFixtureIdTextView)
      var sportsbookSelectionIdTextView: TextView =  dialogView.findViewById(R.id.sportsbookSelectionIdTextView)
      var marketIdTextView: TextView =  dialogView.findViewById(R.id.marketIdTextView)
      var sportsbookMarketIdTextView: TextView =  dialogView.findViewById(R.id.sportsbookMarketIdTextView)
      var sportsbookMarketContextTextView: TextView =  dialogView.findViewById(R.id.sportsbookMarketContextTextView)
      var decimalPriceTextView: TextView =  dialogView.findViewById(R.id.decimalPriceTextView)
      var stakeTextView: TextView =  dialogView.findViewById(R.id.stakeTextView)

      val addToBetslipButton: Button = dialogView.findViewById(R.id.addbetslip_button)
      val cancelButton: Button = dialogView.findViewById(R.id.cancel_button)

      sportsbookFixtureIdTextView.text = "sportsbookFixtureId: ${sportsbookFixtureId}"
      sportsbookSelectionIdTextView.text = "sportsbookSelectionId: ${sportsbookSelectionId}"
      marketIdTextView.text = "marketId: ${marketId}"
      sportsbookMarketIdTextView.text = "sportsbookMarketId: ${sportsbookMarketId}"
      sportsbookMarketContextTextView.text = "sportsbookMarketContext: ${sportsbookMarketContext}"
      decimalPriceTextView.text = "decimalPrice: ${decimalPrice}"
      stakeTextView.text = "stake: ${stake}"

      cancelButton.setOnClickListener {
          dialog.dismiss()
      }

      addToBetslipButton.setOnClickListener {
          val duration = Toast.LENGTH_SHORT

          val toast = Toast.makeText(context, "BET PLACED!!", duration)
          toast.show()
          dialog.dismiss()
      }

      dialog.show()
  }
}
To expose that postSelectedMarket method in the web view you need to consider that those javascript interfaces only accepts primitive types, for this reason we are receiving the entire betslipItem as string, and once the object is received we parse it as object.
To attach this interface in the webview, you need to call the addJavascriptInterface in the webview:
webView?.addJavascriptInterface(
  JavaScriptInterface(this),
  "AndroidVideoPlayerBridge",
);
Once this addJavascriptInterface is called in the webview, the window.AndroidVideoPlayerBridge is available in Javascript, you can use it in the html template, for this example we will handle the event when user clicks on a market:
window.addEventListener("geniussportsmessagebus", async function (event) {
  if (event.detail.type === "player_ready") {
    const deliveryType = event.detail.body.deliveryType;
    const streamId = event.detail.body.streamId;
    const deliveryId = event.detail.body.deliveryId;
    const geniusSportsFixtureId = event.detail.body.geniusSportsFixtureId;
    const dataToPost = {
      endUserSessionId: document.cookie, //user session id
      region: event.detail.body.region, //region
      device: event.detail.body.device, //device
    };
    // Calling your getSteramingData function to get the streaming info from your backeand
    const data = await getStreamingData(
      deliveryType,
      streamId,
      deliveryId,
      geniusSportsFixtureId,
      dataToPost,
    );
    // Please add relevant validation for your backend response
    if (Object.keys(data).length > 0 && !data.ErrorMessage) {
      GeniusLivePlayer.player.start(data);
      document.getElementById("container-video").style.display = "block";
    } else {
      document.getElementById("container-video").style.display = "none";
    }
  }

  if (event.detail.type === "multibet-event") {
    if (window.AndroidVideoPlayerBridge) {
      var jsonselectedMarket = JSON.stringify(event.detail.body);
      window.AndroidVideoPlayerBridge.postSelectedMarket(jsonselectedMarket);
    }
  }
});
As you can see, a new event type called 'multibet-event' has been added to the event handler in the html template, and the following block has been added to this event listener:
if (event.detail.type === "multibet-event") {
  if (window.AndroidVideoPlayerBridge) {
    var jsonselectedMarket = JSON.stringify(event.detail.body);
    window.AndroidVideoPlayerBridge.postSelectedMarket(jsonselectedMarket);
  }
}
This is the key part that is responsible for executing the javascript interface that we created, when the user clicks on a market, the expected visual result for this implementation will be the following:
7. Handle player close.
You should also take into account handling the player close event,
because if it isn't called it WILL leak http requests. Please do it wherever it works best for your application.
You can find an example below:
chevronImageView.setOnClickListener {
    val intent = Intent(this, HomeActivity::class.java)
    startActivity(intent)
    val scriptFunction = "javascript:" +
            """
            if (window.GeniusLivePlayer?.player) {
                  window.GeniusLivePlayer.player.close()
            }
        """.trimIndent()
    webView!!.loadUrl(scriptFunction)
}
As you can see, this is done when clicking on the chevron image view, which is a button in our app that navigates to another part of the application. When this happens, we call the following script in the WebView in order to close it.
![]()
This is the Javascript code to close the video.
if (window.GeniusLivePlayer?.player) {
  window.GeniusLivePlayer.player.close();
}
To learn more about this close functionality, please refer to
Web browser integration
Are you supporting DRM?
To support DRM on Android devices, it is important that the url that is configured in the webView?.loadDataWithBaseURL starts with https protocol, you can get more details about it by visiting the section Integrating in WebView Android/DRM support of the web browser integration page.
The Android Integration was tested on smartphone with android 12 Snow Cone.
Known issues
Full screen API Requires User Gesture
When working with Android's WebView to trigger fullscreen mode via JavaScript, you might encounter the following error:
Failed to execute 'requestFullscreen' on 'Element': API can only be initiated by a user gesture.
Explanation
Modern browsers enforce security restrictions that require certain APIs—like requestFullscreen()—to be initiated only in response to direct user interactions (e.g., clicks or touch events). When you execute JavaScript code using evaluateJavascript() or similar methods outside of a user gesture context, the browser blocks the request, resulting in the above error.
Incorrect Implementation
Using evaluateJavascript() to trigger fullscreen mode can lead to the error because it doesn't necessarily execute in the context of a user gesture:
 private fun handleLandscapeOrientation() {
    val scriptFunction = "var isFullScreen = document.fullscreenElement; " +
            "if(!isFullScreen) { document.querySelector('.full-screen-btn').click()}"
    windowInsetsController?.hide(WindowInsetsCompat.Type.systemBars())
    webView?.evaluateJavascript(scriptFunction, null)
 }
Correct Implementation
To ensure that the fullscreen request is considered a user gesture, use loadUrl("javascript:...") instead:
    private fun handleLandscapeOrientation() {
        val scriptFunction = "javascript:" +
                "var isFullScreen = document.fullscreenElement; " +
                "if(!isFullScreen) { document.querySelector('.full-screen-btn').click()}"
        windowInsetsController?.hide(WindowInsetsCompat.Type.systemBars())
        webView?.loadUrl(scriptFunction)
    }
Why This Works
'loadUrl("javascript:...")': Executes the JavaScript in the context of the current page as if it were initiated by the user, thereby satisfying the user gesture requirement. 'evaluateJavascript()' : Executes the script asynchronously and doesn't inherently associate it with a user action, causing the browser to block the fullscreen request.